Implementing Stringer protection
Run Stringer via the CLI
Options and parameters
java -jar stringer.jar <options> <src> <dest>Valid values <src>:
The original file or directory.
Valid values <dest> (may be the same as <src> except for directories):
Path to destination file or directory. If the <dest> doesn't exists it will be created. By default, type of <dest> is equal to <src>.
Valid values <options>:
-activate- activate the license-activationRequest- generate request code for offline activation-activationResponse- finish offline activation process, enter response code-info- license status-licenseFilefilename- path to license file-configFilefilename- use the configuration parameters from the specific file (Configuration file format)-proguardMapFile- path to ProGuard’s map file-verbose- print verbose log to stdout (default: off)-trialExpirationTimestamp- end of working period of a protected application, in seconds from Epoch/unix time-trialExpirationTimestampPattern- pattern to be used in trialExpirationTimestamp parameter (syntax is similar to SimpleDateFormat class), for example 'yyyyMMdd'
Run Stringer via the Stringer GUI
Options and parameters
IMPORTANT: Stringer GUI does not support all the features that are provided. To access all the functions please use the CLI and a configuration file, or Ant/Maven/Gradle plugins. The GUI supports JARs and directories with classes and resources as an input only.

Source file - the original JAR file or path to a directory containing classes.Destination file - the protected JAR file or path to a directory that will contain protected classes. Source file can be equal to Destination file in case a JAR is being protected. If a directory is to be protected the path must be different. If Destination file does not exist it will be created. By default, type of Destination file is the same as Source file.
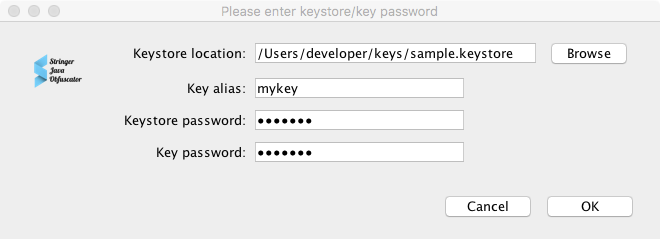
Sign mode - mode of signing the output JAR file (available for JAR files only). The JAR file can be signed in two modes: Default and Release. In the case of the Release mode, it is necessary to specify a keystore, key alias, keystore password and key password in a special dialog window which appears in case the protection process is initiated. None signature mode means no signature will be added.
Protection Options:
- String Encryption – turn on/off the string encryption (default: off)
- Hide Access – turn on/off hiding the API calls (default: off)
- Resource Encryption – turn on/off the resource encryption (default: off)
- Integrity Control – turn on/off the integrity control mechanism (default: off)
You can do the following with the help of the filter:
Encrypt the string constants in a class or classes which correspond to the pattern
Hide API calls in a class or classes which correspond to the pattern
Encrypt resource files which correspond to the pattern
Control elements:
License Info- the license status and activationLoad config- load settings from a configuration fileSave config- save settings to a configuration file
You can use the saved file with settings when using String Java Obfuscator in other modes, i.e. Ant/Maven/Gradle/CLIRun- run obfuscation
After startup, the information about the protection process and the debugging information are displayed if the option Print verbose output to console is enabled. You can click Save to file button to save the log to a file.

Eclipse Plugin
Note: Supports Eclipse starting from Mars version.
Download Stinger Java Obfuscator Eclipse Plugin here, it is also located in the root folder of the distribution package.
Copy
com.licel.stringer.ide.eclipse.jdt.ui.jarinto dropins folder of your Eclipse installationRestart Eclipse
During the first run of the wizards (
JAR File protected by StringerExport Wizard andRunnable JAR File protected by StringerExport Wizard) set the following properties:
path to installed copy of Stringer Java Obfuscator
path to the license file
path to a configuration file
path to a log file
Note: If you are set a configuration file and a log file to be in the project's directory, please make sure they are excluded from the files to be exported.
Ant Task
NOTE: To use Stringer Java Obfuscator as an Ant task, it is necessary to download the obfuscator distribution kit, complete installation, receive the activation code and use it for obtaining your license following the instructions Using CLI and GUI. The license can be activated via GUI or CLI.
To add Stringer Java Obfuscator task to an Ant script, add the following to your ant script (build.xml by default):
<taskdef name="stringer" classname="com.licel.stringer.AntTask" classpath="${stringer.home}/stringer.jar" />To call a stringer task:
<stringer srcFile="${src.jar}" destFile="${dest.jar}"/>The additional parameters can be specified in the outer configuration file:
<stringer srcFile="${src.jar}" configFile="${stringer.config}" destFile="${dest.jar}"/>Or you can specify it inside the task, please see Configuration file format Section section.
Example:
<stringer srcFile=”${src.jar}” destFile=”${dest.jar}”>Maven Plugin
NOTE: To use Stringer Java Obfuscator's Maven plugin, it is necessary to download the obfuscator distribution kit, install the Stringer, get the activation code and use it for obtaining your license following the instructions here: Using CLI and GUI.
IMPORTANT: Stringer Maven Plugin is executed on package phase. In order to build your protected project, please use usual commands: mvn clean install, mvn clean deploy or mvn clean package.
First it is needed to install all the required artifacts (POM files are shipped within the distribution package):
mvn install:install-file -Dfile=$STRINGER_HOME/stringer.jar -DpomFile=$STRINGER_HOME/stringer.pom
mvn install:install-file -Dfile=$STRINGER_HOME/stringer-maven-plugin.jar -DpomFile=$STRINGER_HOME/stringer-maven-plugin.pom
mvn install:install-file -Dfile=$STRINGER_HOME/stringer-annotations.jar -DpomFile=$STRINGER_HOME/stringer-annotations.pom
Example
mvn install:install-file -Dfile=`pwd`/stringer.jar -DpomFile=`pwd`/stringer.pom
mvn install:install-file -Dfile=`pwd`/stringer-annotations.jar -DpomFile=`pwd`/stringer-annotations.pom
mvn install:install-file -Dfile=`pwd`/stringer-maven-plugin.jar -DpomFile=`pwd`/stringer-maven-plugin.pom
Stringer should be executed at the prepare-package phase (to protect Java class files, for example, WEB-INF/classes) or package phase (to protect JAR artifacts) of a lifecycle of a project build. To use it, it is necessary to add a plugin definition to the build/plugins pom.xml section.
Settings can be specified in the outer configuration file:
<project>
  ...
  <build>
    <plugins>
            ...
            <plugin>
            <!-- STRINGER MUST BE THE LAST ONE IN A BYTECODE TRANSFORMATION CHAIN, I.E. THE LAST ONE BEFORE SIGNING PLUGINS IF THERE ARE ANY -->
                <groupId>com.licel</groupId>
                <artifactId>stringer-maven-plugin</artifactId>
                <version>${stringer.version}</version>
                <executions>
                    <execution>
                        <phase>package</phase>
                        <goals>
                            <goal>stringer</goal>
                        </goals>
                        <configuration>
                           <configFile>${stringer.config}</configFile>
                        </configuration>
                    </execution>
                </executions>
            </plugin>
           ...
      </plugins>
  </build>
  ...
</project>
Or you can specify it inside the configuration element, please see Configuration file format Section section.
<configuration>
<verbose>true</verbose>
<protectionElements>
    <protectionElement>
        <stringEncryption>
                <mode>filter</mode>
                <checkCaller>true</checkCaller>
                <filters>
                    <filter>glob:com/sample/Library/**</filter>
                </filters>
        </stringEncryption>
    </protectionElement>
</protectionElements>
</configuration>
Gradle Plugin
Note: To use Stringer Java Obfuscator as Gradle-plugin, it is necessary to download the distribution kit, get the activation code and use it for obtaining your license following the instructions here: Using the console and graphic modes. There are two ways to activate your license: Activation via CLI or Activation via GUI.
Set the path to Stringer Java Obfuscator in your buildscript.repositories, for example:
flatDir { dirs '/Users/developer/Stringer' }Add the following dependencies:
classpath ':stringer-gradle-plugin:'
classpath ':stringer:'
Protecting Java Applications
Add into a Java Application's build.gradle file the following line after
apply plugin: 'java':
apply plugin: 'stringer'Stringer's Gradle plugin automatically detects which of the following parameters should be used. In case you need to customize them there are the properties that can be changed:
Property: licenseFile
Description: Path to the license file
Format: string
Default value: ${user.home}/stringer.licel
Example: licenseFile /Users/developer/stringer.licel
Property: srcFile
Description: Path to the file (JAR, WAR, EAR, etc.) or directory with classes or JARs that is to be protected
Format: string
Default value: $jar.archivePath
Example: srcFile "${projectDir}/build/in.jar"
Property: destFile
Description: Path to the protected file (JAR, WAR, EAR, etc.) or directory with protected classes or JARs
Format: string
Default value: $jar.archivePath
Example: `srcFile "${projectDir}/build/in_protected.jar"
Property: proguardMapFile
Description: Path to ProGuard's map file (class name mapping after name obfuscation)
Format: string
Default value: $proguard.printmapping
Example: proguardMapFile "${projectDir}/build/mapping.txt"
Property: runAfter
Description: A task after which Stringer should be executed
Format: string
Default value: assemble
Example: runAfter customAssemble
Add a section describing the Stringer's task:
stringer {
 configFile "${projectDir}/stringer.xml"
 // Advanced settings:
 // licenseFile "/Users/developer/stringer.licel"
 // srcFile jar.getArchivePath()
 // destFile jar.getArchivePath()
 // proguardMapFile "${projectDir}/build/outputs/proguard/.../mapping.txt"
 // runAfter jar
}
Thus, it should look like this:
buildscript {
 repositories {
     jcenter()
     flatDir dirs: '../..'
 }
 dependencies {
     classpath ":stringer-gradle-plugin"
     classpath ":stringer"
 }
}
apply plugin: "java"
apply plugin: "stringer"
stringer {
 configFile "${projectDir}/stringer.xml"
}
NetBeans
Ant-based Projects
Edit build.xml of the project you want to protect. And add the stringer Ant task defenition:
<taskdef name="stringer" classname="com.licel.stringer.AntTask" classpath="${stringer.home}/stringer.jar"/>Add the stringer task call after project compilation:
'
<target name="-post-jar">
    <stringer srcFile="${dist.jar}"    destDir="${dist.jar}">
        <!-- Place Stringer Java Obfuscator Config here -->
    </stringer>
</target>
Additional settings described in Using as Ant-task.
JavaFX Projects
Edit build.xml of the project you want to protect. And add the stringer Ant task defenition:
<taskdef name="stringer" classname="com.licel.stringer.AntTask" classpath="${stringer.home}/stringer.jar"/>Add the stringer task call:
'
<target name="-post-jfx-jar">
    <stringer srcFile="${jfx.deployment.dir}${file.separator}${jfx.deployment.jar}" destFile="${jfx.deployment.dir}${file.separator}${jfx.deployment.jar}">
        <!-- Place Stringer Java Obfuscator Config here -->
    </stringer>
</target>
Additional settings described in Using as Ant-task.
Maven-based Projects
If you use Maven to build a project in NetBeans then follow the instructions Using as Maven-plugin.
-
Overview
Introduction to Stringer > Overview -
Features
Introduction to Stringer > Features -
Samples
Introduction to Stringer > Samples -
Introduction
Getting started > Introduction -
1. Download
Getting started > 1. Download -
2. Activate
Getting started > 2. Activate -
3. After Activation
Getting started > 3. After Activation -
Configuration file format
Configuring Stringer protection > Configuration file format -
Filters: A guide to targeting code and resources
Configuring Stringer protection > Filters: A guide to targeting code and resources -
Annotations
Configuring Stringer protection > Annotations -
Run Stringer via the CLI
Implementing Stringer protection > Run Stringer via the CLI -
Run Stringer via the Stringer GUI
Implementing Stringer protection > Run Stringer via the Stringer GUI -
Eclipse Plugin
Implementing Stringer protection > Eclipse Plugin -
Ant Task
Implementing Stringer protection > Ant Task -
Maven Plugin
Implementing Stringer protection > Maven Plugin -
Gradle Plugin
Implementing Stringer protection > Gradle Plugin -
NetBeans
Implementing Stringer protection > NetBeans -
JavaFX Projects
Implementing Stringer protection > JavaFX Projects
Link copied!